Showing posts with label Terrain. Show all posts

Tuesday, 28 July 2026

Building a world on a budget. Part seven

 Building a world on a budget

It has been nearly six years since I wrote about my attempts to scratch-build some terrain, which seems like an inordinate amount of time when I think about it. I have made a few pieces during that time, but I have never really felt the need to write about them.

What, I hear you ask, has spurred on this sudden desire to feature one of my terrain pieces on the blog? Well, I am embarking on one of my bigger projects. It is not huge compared with what some wargamers get up to, I'm looking at you, Yarkshire Gamer, but it is big for me.

Most of my games, and the subsequent battle reports, are fought on the edges of society, away from urban areas. I thought it was time to change that by building some urban gaming tiles and the terrain to go with them.

I am going to build four 1' × 1' tiles: two with straight roads and two with corners. I hope these will give me enough variety in the layouts to keep things interesting.

This first blog post will outline the process I used to make the first tile.

Project seven: An urban street-one

Construction

The urban tile started out as a collection of bits and pieces from the 100-yen shop. For a solid base that I hope will not warp, I chose a 30 cm × 30 cm pegboard. The holes in the pegboard should help keep the weight down when I am carrying the tiles around.

On top of the pegboard, I used thin foam board for the road and thicker foam-core board for the concrete areas. The pavement and kerbstones were both made from cardboard. I am hoping that using these different materials will give the finished tile some interesting textures.

I wanted to protect the various materials from water and add a little more texture to the tile before I started painting it, so I mixed some PVA glue with baking powder to make a thick, gritty paste. I then applied this to the entire tile. Once it had dried, I applied a coat of dark grey paint as an undercoat and base coat.

I wanted the tile to have the look of old, weathered concrete, so I grabbed a few different pots of grey and black paint. My original plan was to apply the paint with an airbrush—I do not own one, and probably never will—but the effect did not look right, so I stippled the paint on with a piece of kitchen sponge instead. I was really pleased with the overall effect.


To tone things down, I applied the last of my Agrax Earthshade. It means that I will now have to venture into a Games Workshop once again to buy some more. I have not been to one in years, so I hope the staff in Japan are not as pushy as they were in my experience of the UK.

To finish the tile off, I used a stencil for the road markings, which are a little oversized, but I like the effect. I also added some mud-effect paint to the gutter.

I am pretty happy with how the whole piece turned out. My only worry is that I may not be able to make the other three tiles match the first one, as I am not the most precise person or the best record-keeper.


Sunday, 3 November 2024

Returning to the Cantwara sector an update

 Returning to the Cantwara sector an update

Well, it has been a month since I have last posted about my wargaming efforts.  I have been steadily painting away and purchasing a few more pieces.  Things are coming along nicely.  My purchases are a bit scatter shot as I don`t really have an end goal for my 15mm SCI-FI project.  One of the main things that spurs me on to make purchases is the fear of losing out on something.  It is a little bit of a weird mindset when I consider it, but I don`t think that I am the only wargamer who thinks in this way.

Vehicle from Ground Zero Games

The second of my GZGs truck is finished.  I was inspired by the livery of a local train, the Red Wing, where I live.  


Mine -  Ground Zero Games (I think)

The yellow mine is the last of these mine entrances that I had to paint.  I hope that the different colours will help them stand out well on the table.

Colonial settlement building -  Ground Zero Games

The final  colonial settlement building came together really well.  I have named the bar after a nightclub that I used to frequent as a younger man.  These little nods to the past really help me get invested into this fictional future.


Populating the Cantwara sector

To bring the Cantwara sector alive and to inspire some scenarios I though I had better start adding some non-combat figure to my collection.  

Civilians-  Ground Zero Games

The civilians come from GZG ranges and they will represent people working for Turner`s Mining Syndicate or the TMS.  The paint scheme is inspired by my secondary school sports uniform.


Robots-  Ground Zero Games & Alternative armies

The robots come from GZG & Alternative armies.  I decided to keep the paint scheme fairly simple at first, but I found that leaving them all metal didn`t work for me.  Hence the splash of colour.  


Armed forces in the Cantwara sector

I have two platoons of human forces that I have already painted.  One force of regulars and one force of irregulars that I thought needed an opposing force.  This led me to finally big into my lead mountain and pull out some aliens to paint.

Crusties-  Ground Zero Games

These aliens are, for me, one of GZG`s best ranges.  They paint up really well and stand out from the human forces as they are slightly larger.  I am looking to paint a platoon of them, so around 32.  Each section will have a different colour bandolier to make them easier to recognise on the battlefield.


Now for something a little different

I don`t want the Cantwara sector to focus only only 15mm SCI-FI, as I still love my Old School miniatures.  So, when the urge takes me I will paint other figures that I have.  Here is one example.

Chaos Legionnaire-  Games Workshop

This classic figure has sat, unpainted, in my lead pile since I bought it in the late 80s.  I am glad that he is finally ready to grace the tabletop.


Sunday, 13 October 2024

Returning to the Cantwara sector after a long absence


Returning to the Cantwara sector after a long absence.

Time has a habit of going by far quicker than one expects, I can hardly imagine that I have let this blog lay fallow for so long.  But absence they say makes the heart grow fonder and I have the urge to try and resurrect the blog.  Since my last post I have been wargaming, but like many practitioners of the hobby I have been flitting from one project to another.  I have recently turned to my pile of 15mm Sci-Fi lead, mostly from Ground Zero games, which brought me back to the Cantwara sector.  I plan to morph the blog to not only include my Rogue Trader era miniatures but also all of my Sci-Fi projects.  The narratives will be grounded in the Cantwara sector, but it will take on a less grim dark look.  I hope by opening things up to various other scales, theatres, backgrounds I can post semi-regularly.

So, what have I been working on?  After a bit of thought, and needing a change from painting 20mm Napoleonic infantry, I decided to work on some of the terrain pieces that I have.  The more terrain that I have, the more varied I can make the battlefield and with that the different types of scenarios that I can fight.  Here are the pieces that I have finished so far, the colonial settlement of Keithstown is slowly starting to come to life.

Vehicles from Ground Zero Games - 

These sculpts were a real pleasure to paint and being made of metal they have some real heft to them.


Scatter terrin - Ground Zero Games

Most of the scatter terrain came as Christmas freebies with an order.  They will either serve as terrain or objective markers. 


Mines -  Ground Zero Games (I think)

The mines will do service as terrain, objective markers, and spawn points.  I have one more to paint.  I think that I got these from GZG, but I cannot find them on the website, so I could be wrong or they may no longer be available.


Colonial settlement buildings -  Ground Zero Games

These wonderful buildings make up the colonial settlement pack from GZG, they went together really easily and the painting was a joy.  


Sunday, 26 September 2021

Building a world on a budget. Part six


Building a world on a budget.

It has been quite a long time since I last put the spotlight on a piece of terrain that I have built, so this week, as an interlude from the tales from the Cantwara sector, I thought I would present the Pleasure Dome.  The Pleasure dome is the sixth piece in my terrain building project and it is another piece rescued from obscurity that had sat in my cupboard gathering dust for nine years. 

As I made this piece nearly a decade ago, I don`t have any pictures of the building process.

Project six: The Udon Pleasure Dome

Construction

The pleasure dome’s main structure was made from a convenience store udon bowl.  My original plan was to keep it transparent and have some kind of garden visible inside.  I was inspired by the geodesic domes in the1972 film Silent Running, but after a few failed attempts I put that idea on the back burner and went for a much simpler structure.

I thought that the overall look of the bowl was great and that it would not need much to make it game ready.  I added a cable tie for a vent on the top of the bowl and I dug out a resin door that had sat in my bits box for an age.  Rather than cutting out a hole in the bowl to accommodate the door I used modelling putty to fashion a doorway.

Like the previous structures that I have made the texture on the bunker was achieved by using a Tamiya texture paint.  I am fairly certain that I used the Tamiya concrete texture paint for this build, but it was a long time ago and I may have used snow or mud.  The building was painted grey, and I then used a Coat d`arms super shader.  I was never really satisfied with the way the structure looked, which helps to explain why the dome sat in my cupboard for nearly ten years, so I decided to repaint it.

For the paint scheme, I went back to basics and undercoated the building in black, applied a dark blue base coat, then a blue wash.  After that it was just a matter of dry brushing several different layers of blue onto the building.  I thought that the building looked a bit boring all in the same blue, so I decided to pick out some different areas in  purple.  The blue and purple paint scheme then gave me some ideas about what the domes purpose was in the Cantwara sector.  

To detail the pleasure dome I turned to my collection of transfers.  These I used for the building designation number, some signage, and the name of the dome. I tried to keep them as uniform as possible, but there are a few sections that could have done with a steadier hand.  Still, I think the effect is quite presentable.

To finish the pleasure dome, I added some flock around the bottom of the dome. 

Overall, this is a piece that I am really pleased with and has already done go service on the battlefields of the Cantwara sector.


Thursday, 8 July 2021

Building a world on a budget. Part five.

 Building a world on a budget.

For the fifth piece in my terrain building project, I decided to move away from my usual single building projects to some scatter terrain.  Also, unlike my previous terrain building posts I have not made these pieces, but rather they were a lucky find that I have weathered, for them to give good service on my gaming table.

Project five: One-hundred-yen shop shipping containers.

Weathering

The shipping containers were originally designed as stationery tins, but the minute I saw them I thought that they would be perfect for my gaming table.  The first thing that I had to do to get them table ready was to try and dull down their shiny new look. 

I started the weathering process by applying several coats of Vallejo black wash.  I tried to vary how much wash I put on each container, after I received some excellent advice on weathering shipping containers from the OldHammer Facebook group, to give the containers the look of varied age.


As an experiment I decided to try out a brown wash, the wash was a bit thick after I applied it and it looked quite a mess.  So, I tried wiping a lot of the ink off and the finish was quite pleasing. 

To further weather some of the containers I took my hobby knife to some of them and scraped some of the paint away.  I tried to do it in places where the containers may have got damaged in use.  I then experimented with two Vallejo rust effect paints to, again, vary the aged appearance of the containers.  An important lesson that I learnt from using these paints was that the particles in the paints, that give a great rust effect, destroy paint brushes.  Sadly, I did not realise that until I had destroyed one of my good brushes. 


These containers were a nice alternative project that look good on the table and allowed me to experiment with some paints and techniques that I had not used before.  Of course, I ended up buying a few more of the containers than I had planned when I first saw them, but they have already done some sterling service on my table. 


Wednesday, 30 June 2021

Building a world on a budget. Part four.


Building a world on a budget.

The fourth piece in my terrain building project follows the same theme as the previous terrain post, in that, I am once more returning to a piece that I made nine years ago.  I am sorry to say that I do not have any pictures of the building process.

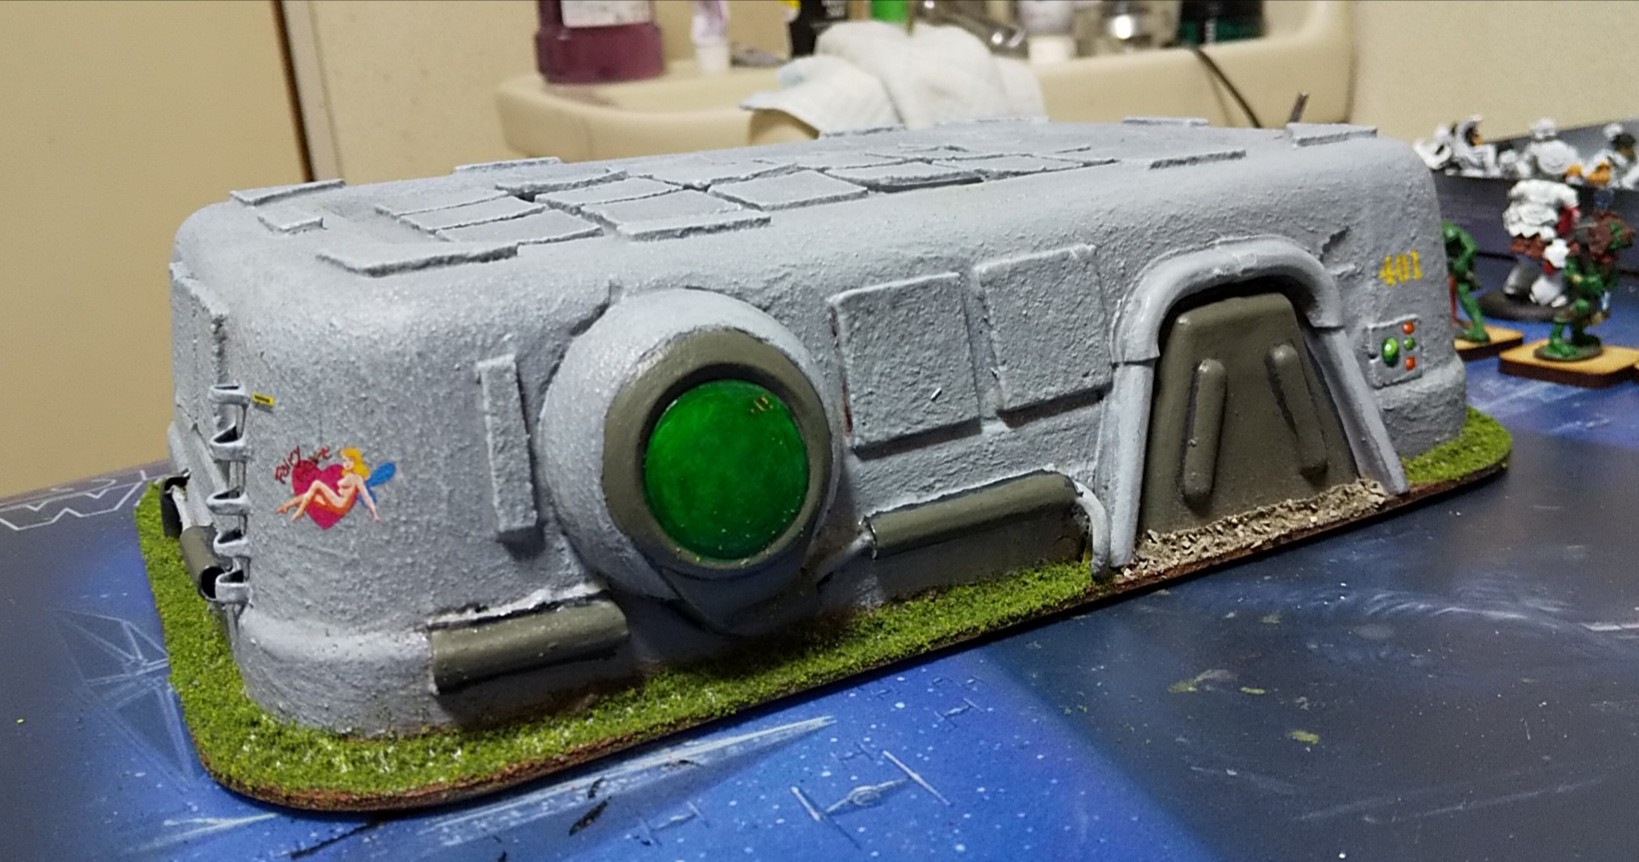
Project four: The Yakisoba bunker.

Construction


The bunker`s main structure was made from an instant yakisoba tub, in which I punched some holes for the door and the window.  I really liked the shape of the tub it reminded me of the buildings in Mos Eisley which is never a bad thing. 

To detail the bunker, I went back to my collection of gubbins and used straws for the pipes and the ladder, an old broken earphone for the window, a blister pack for the door, small pieces of cork for the wall details, and a piece of broken electronics for the door control panel.  

I would love to say that I plan these things before I start making them, but the truth is I generally let the piece grow organically as I am making it.

The texture on the bunker was achieved by using a Tamiya texture paint.  I think that I used their concrete texture paint for this build, but it was a long time ago and I may have used snow or mud.  

Originally the building was painted grey, and I then used a Coat d`arms super shader.  I was never happy with the finish, which is partly why the bunker sat in a box for nearly ten years, so I decided to spruce the paint job up. 

For the paint scheme, I went back to basics and undercoated the building in black, applied a grey black base coat, then a black wash.  After that it was just a matter of dry brushing several different layers of grey onto the building.  The building looked a little dull all in the same grey, so I decided to pick out some different areas in a darker green grey to help break up the monotony of the paint scheme.  


As a finishing touch for the piece I added several bits of graffitti and building designation numbers to the bunker.  These are all transfers rather than any freehand work by me, but overall I think that they really add something to the building.